One of these features involves something called “macros” that can be a game-changer for a lot of Exccel users. If you are having trouble using some of these macros, however, then our tutorial below will show you how to enable them in Excel 365.
Summary – How to Enable Excel 365 Macros
Our guide continues below with additional information on enabling Excel 365 macros, including pictures of these steps. There are some scripts that can be run on Microsoft Excel files using something called Macros. These can be extremely useful, but they can also be dangerous. So if you need them for a file, then you may be wondering how to enable macros in Excel for Office 365. Macros in Microsoft Excel are commonly used to automate certain processes. The macro is a series of actions that are performed on a spreadsheet, typically saving a large amount of time. But macros can be used maliciously, and there is a risk to enabling macros on a spreadsheet that you have received from an unknown person. Due to this risk, Excel disables macros by default. But if you have a file with macros, and you trust the sender, or know the file to be safe, then you can continue below and see how to enable macros in Microsoft Excel. If you are using Microsoft Excel on a MacBook, then our how to add Developer tab in Excel Mac can show you how to add that option to the ribbon so you can use some of the more advanced features offered by that application.
How to Activate Macros in Excel (Guide with Pictures)
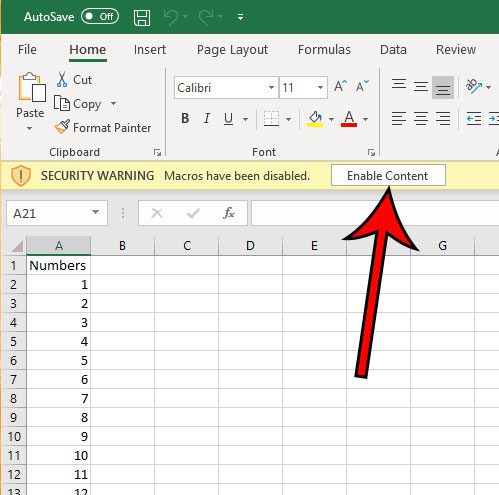
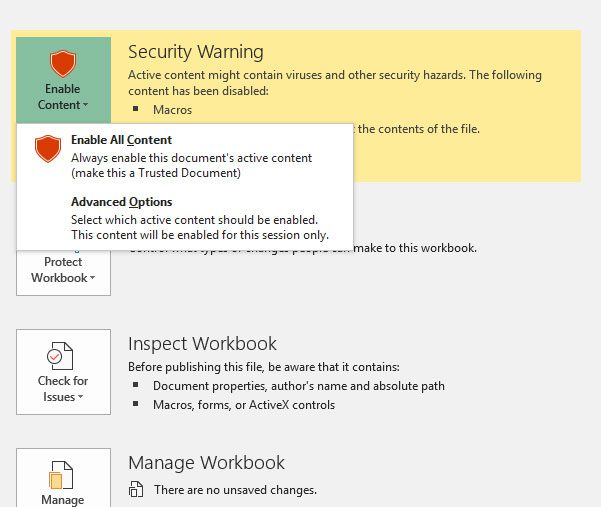
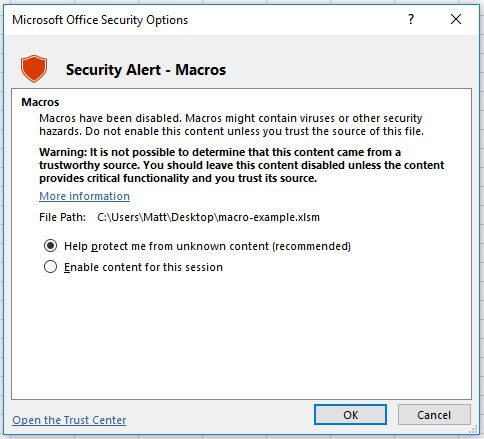
The steps in this article were performed in the Windows desktop version of Excel for Office 365. The first part of this article provides a quick overview of how to enable macros in Excel worksheets. For additional information on how to change how Excel handles macros in the future, including pictures, keep scrolling, or click here to jump to that part of the article. When you open an Excel file with macros, you should see a notification above the spreadsheet that looks like the image below. Clicking that Enable Content button will let the macros run in the spreadsheet. Alternatively, rather than clicking that button, you could click the File tab, then the Enable Content button in the Security Warning section and always enable content in this file. Or, finally, you could select Advanced Options where you are given the choice to only allow the macros for this session.
If you want to change the macro settings in Excel for all future files, then you can do so with the following steps.
How to Enable Macros in Excel for Future Files (Guide with Pictures)
This section of the article will discuss a setting on the Excel Options menu that you can change to adjust the way that Excel will handle macros for the files that you open in the application in the future. Now that you know how to enable macros in Excel 365 you will be able to control the way that Excel handles them whenever it encounters a file that contains them.
Excel 365 Macros Settings
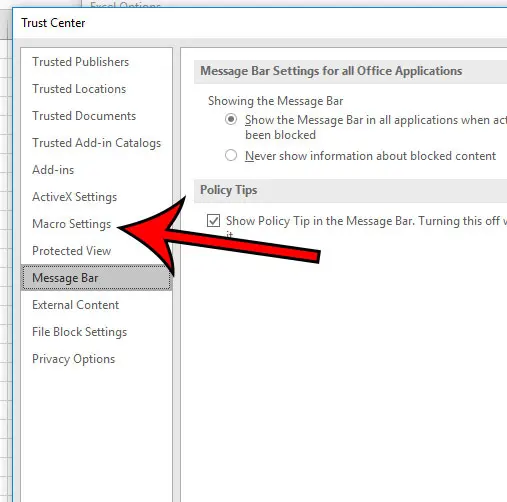
The Macro setting options in Excel for Office 365 are:
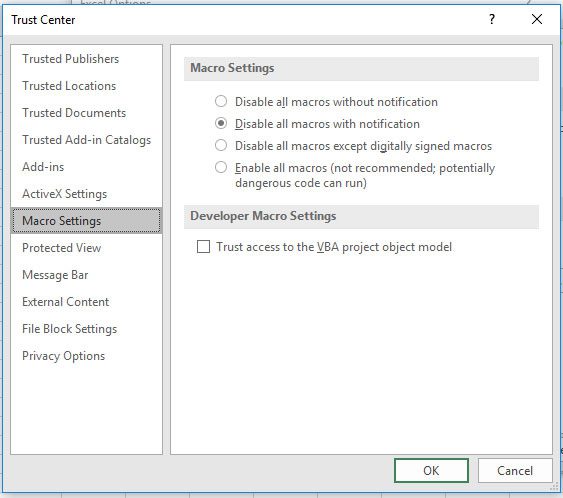
Disable all macros without notification – Excel simply blocks all macros without giving you the opportunity to choose whether to run them or not. Disable all macros with notification (this is probably your current setting if you’ve never changed it) – Blocks macros, but gives you the option to run them by showing a notification with an Enable Content button. Disable all macros except digitally signed macros – All macros are blocked, except those that have been created by a Microsoft trusted publisher Enable all macros (not recommended; potentially dangerous code could run) – Any macro in any spreadsheet will run. It’s probably best not to use this option as it could potentially harm both your Excel installation and, potentially, your entire computer.
Do you have a spreadsheet with a VLOOKUP formula in it, but you’re seeing a bunch of #N/A? Find out how to adjust your formula and display a 0 instead if it’s affecting other formulas.
Related Guides
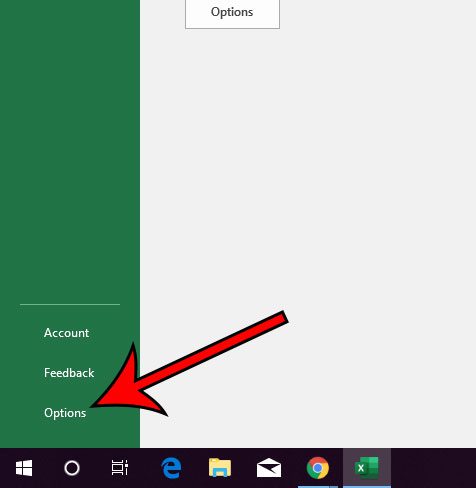
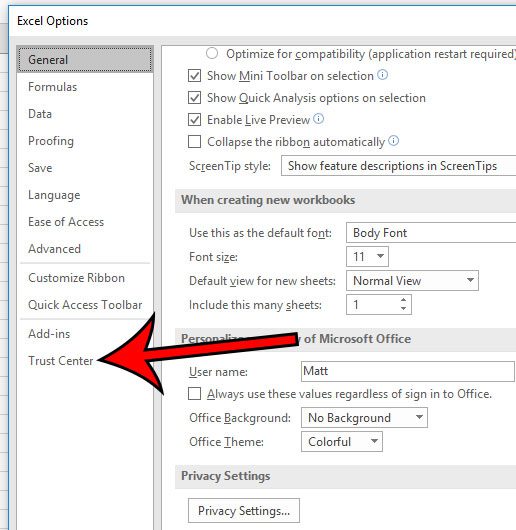
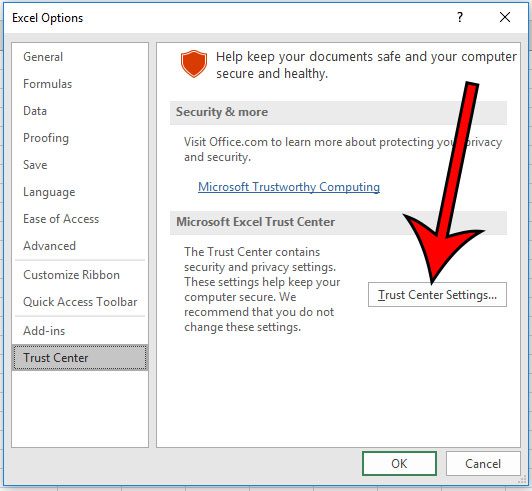
You can then choose the Customize Ribbon tab at the left side of the window, check the box to the left of Developer in the right column, then click the OK button to save your changes. You can do this by going to File > Options > Trust Center > Trust Center Settings > Macro Settings > choose to Disable all macros without notification or Disable all macros with notification > click OK. You can do this by going to File > Options > Trust Center > Trust Center Settings > Macro Settings > choose to Enable all macros > click OK. Once you have macros enabled in this manner they will run automatically when you open a file that includes them. But you can also enable the Developer tab, then click the Visual Basic button that appears in the Code group of that tab in the ribbon. Note that you will see a Microsoft Excel security notice if you have the Visual Basic window opened and you try to run a macro in your workbook. After receiving his Bachelor’s and Master’s degrees in Computer Science he spent several years working in IT management for small businesses. However, he now works full time writing content online and creating websites. His main writing topics include iPhones, Microsoft Office, Google Apps, Android, and Photoshop, but he has also written about many other tech topics as well. Read his full bio here.
You may opt out at any time. Read our Privacy Policy

title: “How To Enable Macros In Excel For Office 365” ShowToc: true date: “2022-11-30” author: “James Collison”
One of these features involves something called “macros” that can be a game-changer for a lot of Exccel users. If you are having trouble using some of these macros, however, then our tutorial below will show you how to enable them in Excel 365.
Summary – How to Enable Excel 365 Macros
Our guide continues below with additional information on enabling Excel 365 macros, including pictures of these steps. There are some scripts that can be run on Microsoft Excel files using something called Macros. These can be extremely useful, but they can also be dangerous. So if you need them for a file, then you may be wondering how to enable macros in Excel for Office 365. Macros in Microsoft Excel are commonly used to automate certain processes. The macro is a series of actions that are performed on a spreadsheet, typically saving a large amount of time. But macros can be used maliciously, and there is a risk to enabling macros on a spreadsheet that you have received from an unknown person. Due to this risk, Excel disables macros by default. But if you have a file with macros, and you trust the sender, or know the file to be safe, then you can continue below and see how to enable macros in Microsoft Excel. If you are using Microsoft Excel on a MacBook, then our how to add Developer tab in Excel Mac can show you how to add that option to the ribbon so you can use some of the more advanced features offered by that application.
How to Activate Macros in Excel (Guide with Pictures)
The steps in this article were performed in the Windows desktop version of Excel for Office 365. The first part of this article provides a quick overview of how to enable macros in Excel worksheets. For additional information on how to change how Excel handles macros in the future, including pictures, keep scrolling, or click here to jump to that part of the article. When you open an Excel file with macros, you should see a notification above the spreadsheet that looks like the image below. Clicking that Enable Content button will let the macros run in the spreadsheet. Alternatively, rather than clicking that button, you could click the File tab, then the Enable Content button in the Security Warning section and always enable content in this file. Or, finally, you could select Advanced Options where you are given the choice to only allow the macros for this session.
If you want to change the macro settings in Excel for all future files, then you can do so with the following steps.
How to Enable Macros in Excel for Future Files (Guide with Pictures)
This section of the article will discuss a setting on the Excel Options menu that you can change to adjust the way that Excel will handle macros for the files that you open in the application in the future. Now that you know how to enable macros in Excel 365 you will be able to control the way that Excel handles them whenever it encounters a file that contains them.
Excel 365 Macros Settings
The Macro setting options in Excel for Office 365 are:
Disable all macros without notification – Excel simply blocks all macros without giving you the opportunity to choose whether to run them or not. Disable all macros with notification (this is probably your current setting if you’ve never changed it) – Blocks macros, but gives you the option to run them by showing a notification with an Enable Content button. Disable all macros except digitally signed macros – All macros are blocked, except those that have been created by a Microsoft trusted publisher Enable all macros (not recommended; potentially dangerous code could run) – Any macro in any spreadsheet will run. It’s probably best not to use this option as it could potentially harm both your Excel installation and, potentially, your entire computer.
Do you have a spreadsheet with a VLOOKUP formula in it, but you’re seeing a bunch of #N/A? Find out how to adjust your formula and display a 0 instead if it’s affecting other formulas.
Related Guides
You can then choose the Customize Ribbon tab at the left side of the window, check the box to the left of Developer in the right column, then click the OK button to save your changes. You can do this by going to File > Options > Trust Center > Trust Center Settings > Macro Settings > choose to Disable all macros without notification or Disable all macros with notification > click OK. You can do this by going to File > Options > Trust Center > Trust Center Settings > Macro Settings > choose to Enable all macros > click OK. Once you have macros enabled in this manner they will run automatically when you open a file that includes them. But you can also enable the Developer tab, then click the Visual Basic button that appears in the Code group of that tab in the ribbon. Note that you will see a Microsoft Excel security notice if you have the Visual Basic window opened and you try to run a macro in your workbook. After receiving his Bachelor’s and Master’s degrees in Computer Science he spent several years working in IT management for small businesses. However, he now works full time writing content online and creating websites. His main writing topics include iPhones, Microsoft Office, Google Apps, Android, and Photoshop, but he has also written about many other tech topics as well. Read his full bio here.
You may opt out at any time. Read our Privacy Policy
