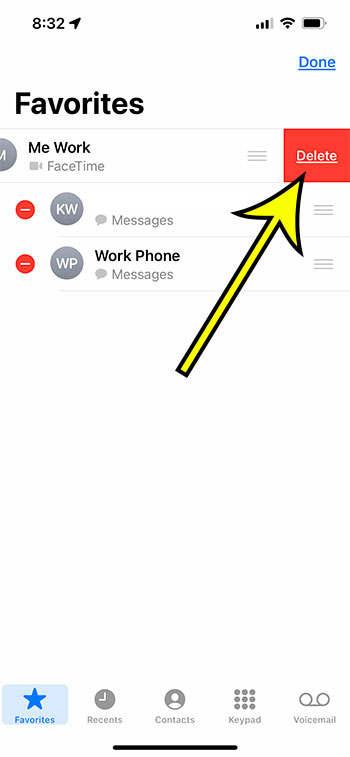
But if there is a contact on there that you no longer wish to have as a favorite, then you can delete that favorite by going to Phone > Favorites > then tapping Edit, touching the red circle next to the contact, then tapping Delete. There can be thousands of contacts on our iPhones, and some are used more frequently than others. So it’s quite natural for us to mark a few of them as favorites for easy access. But with time, you may need to remove those contacts from the favorites for any random reason. Now the question is how to remove contact from favorites on iPhone? Don’t worry; we’re here with the solution. By the time you finish reading this article, you’ll be able to effectively manage the favorites list on your iPhone so that it only contains the contacts that you need to reach the most. So let’s get started, shall we?
How to Unfavorite a Contact on iPhone
Our guide continues below with additional information on removing an iPhone contact, including pictures of these steps.
How to Delete a Favorite Contact from Your iPhone – Step by Step
Here we’ll tell you how to unfavorite a contact on iPhone individually. So without wasting much time, let’s dive into that.
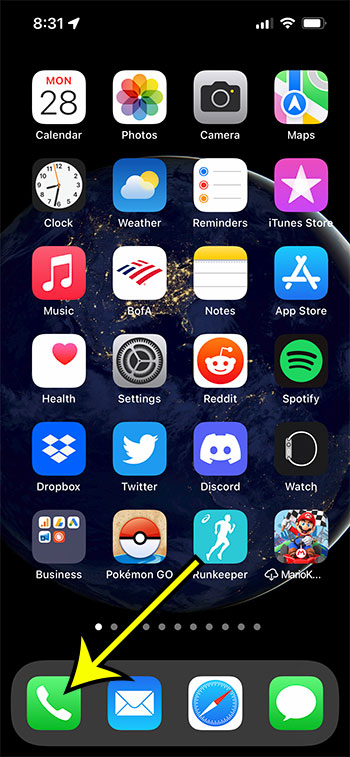
Step One – Open the Phone App
To find out the favorite menu, you need to tap the Phone icon to launch the phone app. And then, you can take measures to remove favorites from your Apple phone.
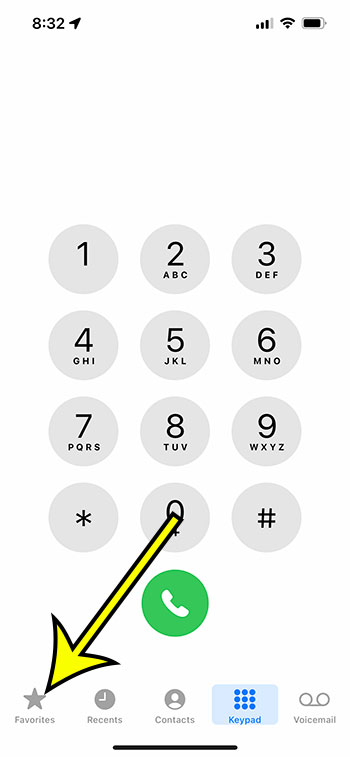
Step Two – Go to the Favorites Icon
When you enter into the Phone App, you’ll see the Favorites list, which includes every contact that you have designated on your iPhone as a favorite.
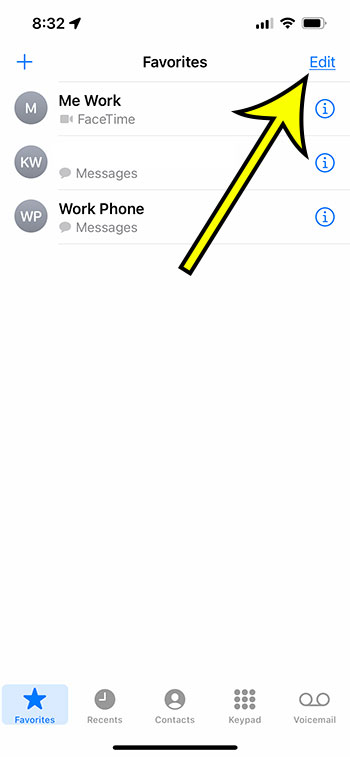
Step Three – Tap the Edit icon at the top-right of the screen.
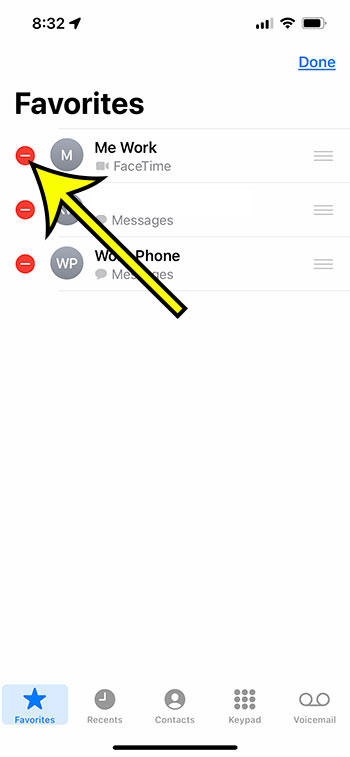
Step Four – Tap the red circle next to the contact that you want to unfavorite.
After accessing the Edit option, you’ll see your phone favorites contacts, and there’ll be a red minus icon beside them. The Delete button will appear when you tap the red circle, and then you can delete iPhone favorites according to your preference.
Step Five – Remove the Contact from iPhone’s Favorites List.
Now that the Delete button has appeared, all you have to do is click on it, and the contact will be removed from the Favorites list. And when you’re done deleting, press Done. And this is how you remove a contact from iPhone favorites successfully.
How to Arrange the Order of Your Favorite Contacts?
We always add some favorite contacts to provide a means of easily accessing them among all of the contacts that we have saved to our device. But when the iPhone favorites list is overflowing, the process can become super hectic. That’s why you need to arrange the contact details alphabetically, which will make the task breezier. So how do you alphabetize your contacts on the favorite list? Well, we’re about to discuss that now.
Step One – Go to the Favorite Contacts
First, you have to open the Phone app and then tap Favorites contact list; after that, you can see every contact on the list.
Step Two – Select Contacts
To arrange the contacts alphabetically on the favorites screen, you need to tap on the icon that looks like three horizontal lines. You can find this icon on the right side of the contact you want to move. Just click and hold the icon to drag and move the contact up and down.
Final Step – Move Every Contact Manually
If you want to see every contact on the right spot, you must repeat step two for all the phone numbers. And when you’re satisfied with the list, just press Done to finish the process.
How to Add a Contact to Favorites on Your iPhone – Step by Step
Some of you are having difficulty deleting the contact from the favorites list, and others might be struggling to add a number to that list. But you don’t have to worry about that anymore as we will discuss this procedure now.
Step One – Launch the Phone App
Yes, just like any other contact-related task, you have to click on the Phone icon and launch the app first. This way, you’ll get access to the Favorites list.
Step Two – Go to Your Contacts
After getting access to the Favorites list, you’ll see the numbers already added, or maybe the list is empty in your case. Don’t worry; it’s time to add the contacts here. When the Favorites screen shows up, you’ll see a Plus icon. Now, tap that option; all of your saved contacts on the iPhone will appear before you.
Final Step – Start Adding the Contacts
As all the contacts on your phone are visible now, you have to scroll through them to find the details you want to add to the favorite list. Once you see the contact, you want to add, just tap on it, and the number will be added to the favorites.
Additional Option for Adding a Contact to Favorites
While the section above provides a convenient way to include a contact in your Favorites list, there is another way to do it too. Step 1: Open the Phone app. Step 2: Select the Contacts tab. Step 3: Choose the contact that you would like to add to your Favorites. Step 4: Scroll down and select the Add to Favorites option.
How to Make a Contact Shortcut on iPhone?
Adding contacts on the Favorites list makes the task easier; there’s no doubt about that. But you’ll still have to pick the calling option, which can be a bit time-consuming. In that case, the fastest option you can pick is to add the speed dial option on the home screen. This way, you can just click on the shortcut and call the person you want to talk to. And this is how you do it:
Step 1: Launch the Shortcuts App.
Instead of launching the Phone app, this process will require you to access the Shortcuts App. After opening it, you are going to be creating an action that your phone will perform automatically (calling a contact that you choose) when you tap the icon on your Home screen. If you are having trouble finding the app you can just swipe down on your Home screen and search for it.
Step 2: Touch the + icon at the top-right of the screen, then choose Add Action.
Step 3: Type the word “call” into the search bar, then choose the Phone option.
Once you type your search term into the search field you are going to see a bunch of options, but we are going to use the one for the default “Phone” app that is listed in the horizontal bar at the top of the screen.
Step 4: Select the Call option, tap “Contact” then search for the contact to include on the shortcut.
You might see another call row where the contact you wish to use is listed, so you can elect to tap the contact there instead.
Step 5: Tap the blue circle with three lines at the top-right of the screen, then choose “Add to Home Screen.”
Note that there are a few other options you could select rather than adding an icon to the Home screen. Once you choose to add the action to the Home screen you can edit the icon and name for the icon, then touch the Add button at the top-right of the screen. Our tutorial continues below with additional discussion on iPhone favorites and how to manage them.
More Information on How to Remove Favorites on an iPhone
When you remove a contact from your favorites, it is only going to remove the favorites tag from that contact. The contact is still on your phone until you also elect to delete it entirely. You can delete a contact by going to Phone > Contacts then selecting the contact. You will then need to select Edit at the top right of the screen, then scroll to the bottom and choose the Delete Contact option. Note that there is also a dedicated “Contacts” app on your iPhone that you can use. However, for many iPhone users, this app icon is going to be inside of a folder called “Utilities” or “extras” that they have trouble finding. You can also search for the Contacts app by swiping down on your Home screen to open Spotlight Search, then type “contacts” into the search field and choose the app from the list of results. If you’ve elected to add the contact to your Home screen by creating a shortcut then you can delete that shortcut the same way that you would delete an app on the device. You can tap and hold on the icon, then choose the Delete Bookmark option. You will then need to confirm that you wish to remove the bookmark.
The Bottom Line
So here’s everything you need to know on how to remove a contact from favorites on iPhone. The procedures surely come with a learning curve, but once you start doing it, you’ll be an expert in no time.
Additional Reading
He specializes in writing content about iPhones, Android devices, Microsoft Office, and many other popular applications and devices. Read his full bio here.
