But when you use the “insert page break” tool in an attempt to fix problems with the automatic page breaks then you can easily cause some problems. These issues can be frustrating to fix because manually inserted page breaks aren’t easy to see and can be problematic when data is added or removed from a spreadsheet. Spreadsheets created in Microsoft Excel 2013 rarely print how you want them to by default. This will lead to adjustments of many of the page elements that affect printing, and might even include the insertion of manual page breaks. But if you start to modify the rows, columns, or individual cells in your worksheet, then you may find that your manual page breaks result in some strange printing behaviors. Going back and adjusting these manual page breaks can be frustrating, so you might decide to simply remove all of the page breaks and start over. Our tutorial in this article will show you the steps to take to reset all of your worksheet’s page breaks.
How to Remove All of the Page Breaks from a Worksheet in Excel
Our guide continues below with additional information on removing all of the page breaks from an Excel spreadsheet, including pictures of these steps.
How to Reset Page Breaks in Excel 2013 (Guide with Pictures)
The guide below will assume that you have a worksheet in Microsoft Excel 2013 that contains manual page breaks, and that you wish to remove all of the page breaks and reset to the page breaks that occur by default. If you follow our steps below and do not see a “Reset All Page Breaks” option, then there are no manual page breaks in your worksheet. If your worksheet is printing strangely without page breaks, then there may be a defined print area. Learn how to clear a print area in Excel 2013.
Step 1: Open your file in Excel 2013.
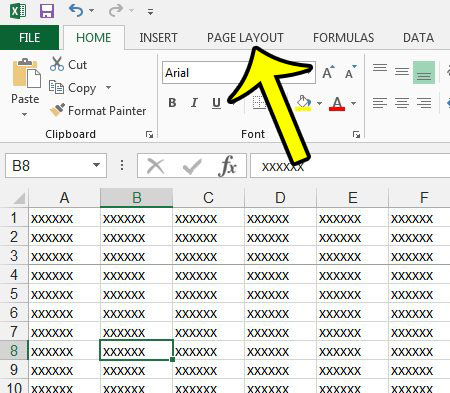
Step 2: Click the Page Layout tab at the top of the window.
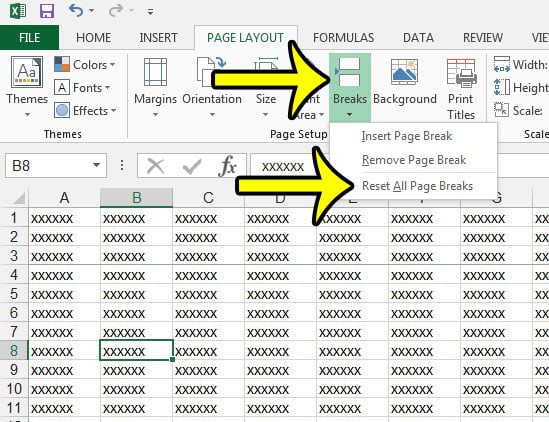
Step 3: Click the Breaks button in the Page Setup section of the navigational ribbon, then click the Reset All Page Breaks option.
Removing page breaks in Excel 2013 is done at the worksheet level. If you wish to remove page breaks from multiple worksheets, then you will need to do so to each sheet individually.
Why Would I Need to Add or Remove a Page Break in Excel?
Microsoft Excel can be a very difficult application to work with when you need to print something. It doesn’t understand the data that you have typed into your cells, and isn’t going to try and keep rows or columns together on one page if that would make the data easier to read. One way that you can try and fix this printing dilemma is with manual page breaks. When you add a manual page break you are telling Excel that it should start a new page at that spot. This gives you some control over what data prints on which page, which can make it easier for your audience to be able to understand your data. But it’s very likely that someone could have different ideas for a spreadsheet, causing them to remove or add more data. The manual page breaks won’t update to reflect this, and you could wind up with odd print jobs as a result. In these cases you need to be able to remove those manual page breaks so that you can make everything print properly.
More Information on How to Remove Page Breaks in Excel 2013
As we mentioned before, removing page breaks in Microsoft Excel is one of the actions that you cannot take when you have multiple worksheets selected. If you wish to reset all page breaks for one that one worksheet in your Excel workbook then you will need to go through the entire workbook and select each of the individual sheets for which you wish to reset the page breaks. If you only want to remove a single page break in Microsoft Excel then you can click in a cell in the row below the page break, then click the Breaks button in the Page Setup group and choose the Remove Page Break option. If you want to remove a vertical page break then you can click in a cell to the right of the page break instead. While you can see page breaks in the Normal view in Excel by looking for slightly darker gridlines, they can be pretty difficult to see. You may want to consider going to File > Print and checking the Print Preview to see how the printed worksheet will look, or going to the View tab and clicking Page Break Preview or Page Layout to see how things will look on the printed page. Some people will even click Page Break Preview and leave Excel in that view mode because they find it to be an easier way to work. If you are having trouble trying to get the right type of page break in Excel 2013 when you are just clicking individual cells, then try selecting an entire row or column instead. If you click a row number to select the entire row, then Excel will add a horizontal page break above that row when you click Insert Page Break. Conversely, if you click a column letter to select an entire column, then Excel will add a vertical page break to the left of the row when you add a page break. There are many settings in Microsoft Excel 2013 that can affect the way your spreadsheet prints. One setting that is commonly adjusted is the gridlines or borders that visibly separate your cells. Learn how to print without cell borders or gridlines in Excel 2013 and see both of the settings that can affect the printed lines.
He specializes in writing content about iPhones, Android devices, Microsoft Office, and many other popular applications and devices. Read his full bio here.


